


Blood collected in a plain tube without a clot activator often needs about 60 minutes at room temperature before centrifugation. Use the tube manufacturer’s instructions and the laboratory’s validated procedure to establish the actual waiting period. The sample must have completed clot formation before spinning; reaching a scheduled time alone does not establish that it is ready.
Starting centrifugation too early can leave residual fibrin in the serum. These strands or small clots can obstruct an analyzer’s sampling probe, interfere with aspiration, or require additional sample preparation. A reliable workflow therefore combines a documented collection time, appropriate holding conditions, and assessment of clot formation before the tube enters the centrifuge.
Confirm what “plain tube” means before setting the timer
The name “plain tube” is sometimes used loosely for a serum collection tube. However, tubes intended for serum preparation differ in their materials and internal additives. A tube without an anticoagulant is not necessarily free of a clot activator. Some serum tubes contain an additive that accelerates clotting, even when they have no separator gel.
Read the tube label and product instructions instead of relying on cap color. Color conventions vary between manufacturers and product ranges. Establish whether the tube contains a clot activator, separator gel, or neither, and whether it is approved for the requested tests. A waiting time specified for an activated serum tube should not automatically be applied to a genuinely additive-free tube.
Tube material also matters. Glass surfaces promote contact activation of coagulation, while plastic generally provides less surface activation. Many plastic serum tubes therefore incorporate clot-promoting materials. The manufacturer’s instructions account for the tube’s construction more reliably than a rule based only on its appearance.
Count from collection and control the holding conditions
Record the collection time and use the laboratory’s defined timing convention consistently. Waiting until the sample reaches the processing bench to start the timer creates avoidable variation. Transport time contributes to the elapsed period, but the conditions during transport still matter: an hour in a cold environment is not equivalent to an hour under the validated room-temperature conditions.
Keep the tube capped and upright in a suitable rack during clot formation. Upright storage supports orderly clot development and subsequent separation. Avoid vigorous shaking, repeated inversion, or unnecessary movement. For a genuinely additive-free tube, mixing to distribute an additive is unnecessary; any handling requirement should come from the instructions for the exact tube.
Room temperature means the range accepted in the laboratory’s procedure. Do not accelerate clotting with a heater, warm-water bath, or direct sunlight. Uncontrolled warming can affect specimen integrity and test results. Similarly, placing freshly collected blood in a refrigerator to “keep it fresh” can delay clot formation. Tests with special temperature requirements need a specimen pathway established for those requirements.
Batch processing should preserve individual collection times. If several tubes were collected at different times, centrifuging the whole rack when the earliest tube reaches its waiting interval leaves later specimens under-clotted. Record the times or arrange the rack so that each sample’s readiness remains clear.
A visible clot is useful evidence, with limits
A formed clot generally appears as a coherent mass, with some separation of liquid as the clot retracts. However, an externally visible clot does not prove that all fibrin formation has finished. A sample can look substantially clotted and still produce fibrin strands after centrifugation, especially when coagulation is delayed.
Assess the specimen through the tube where possible. If the local procedure includes a gentle positional assessment, use that defined method without shaking the sample. Do not repeatedly uncap the tube, insert a stick, or manipulate the clot simply to decide whether the waiting period is over. These actions introduce exposure and contamination risks and can disturb the specimen.
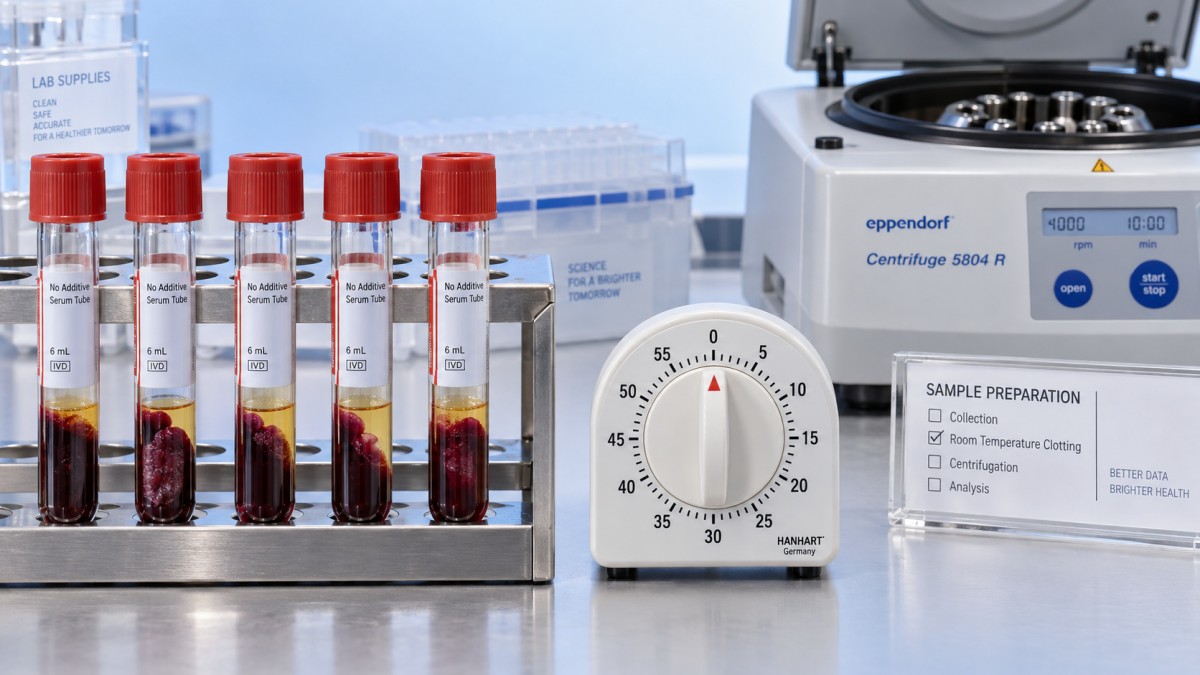
The practical decision combines three observations: the required interval has elapsed, the holding conditions were appropriate, and clot formation appears consistent with the validated acceptance criteria. When the sample remains partly liquid or contains an obviously loose, incomplete clot at the expected time, continue processing through the laboratory’s delayed-clotting procedure rather than treating the timer as authorization to spin.
Clot size alone is a poor guide. Fill volume, blood cell concentration, and clot retraction influence its appearance. A small amount of visible serum before centrifugation does not necessarily indicate a collection problem, and a large clot does not establish that the specimen will be free of residual fibrin.
When an hour is not enough
Anticoagulant treatment and coagulation abnormalities can prolong clot formation. The effect varies with the medication, its concentration, and the underlying condition. If relevant clinical information is available, incorporate it into the processing decision. Do not assume that every sample from a person receiving anticoagulant treatment will behave identically.
Contamination with an anticoagulant creates a different problem. Blood drawn through a line containing residual heparin, or contamination from an additive tube during collection, can impair clotting and alter analytical results. Extending the waiting period does not correct additive contamination. An unexpectedly persistent failure to clot should prompt review of the collection source and sequence, with recollection considered under the laboratory’s acceptance policy.
Temperature history is another useful distinction. A specimen that spent its waiting period in a chilled transport container may need assessment under an approved procedure before centrifugation. Simply adding an arbitrary period at the bench provides no assurance that the sample remains suitable for every requested assay.
Delayed clotting also creates a competing concern: continued contact between serum and blood cells. Cellular metabolism and exchange of substances continue before separation and can change some measured concentrations. The acceptable delay depends on the analyte and storage conditions. Waiting indefinitely for a troublesome specimen is therefore inappropriate; use the test-specific processing limit to decide whether further waiting, escalation, or recollection is needed.
Move from clotting to centrifugation without improvising settings
Once the specimen meets the clotting criteria, centrifuge it using the tube manufacturer’s specified relative centrifugal force and duration, together with the laboratory’s validated method. A longer clotting interval does not justify a shorter spin, and a stronger spin does not compensate for incomplete coagulation.
Relative centrifugal force, expressed as × g, is more transferable than revolutions per minute. The force produced at a given rotational speed changes with rotor radius. Copying an rpm setting from another centrifuge can therefore produce a different separation. Use the correct rotor information when converting settings, and remain within the tube’s stated operating limits.
Balance the centrifuge according to its instructions and inspect tubes for damage before loading. After spinning, assess the serum for residual fibrin, adequate separation, and visible specimen abnormalities. In a plain tube without separator gel, there is no gel barrier isolating serum from the clot. Transfer serum into an appropriate labeled secondary container when required by the test procedure, without disturbing or carrying over cells.
Hemolysis, lipemia, and fibrin require different interpretations. Red or pink serum suggests hemolysis, while turbidity can have several causes, including lipemia. Neither appearance proves that the clotting interval was too short. Threadlike material or newly formed small clots points more directly toward residual fibrin, but specimen acceptability still depends on the requested assay and the laboratory’s criteria.
If fibrin appears after the first spin
Pause analyzer loading when visible fibrin remains in the serum. A clear-looking upper layer does not exclude fine strands near the clot or suspended in the sample. Where instrument procedures require a fibrin inspection before aspiration, complete it before transferring the specimen to the analyzer.
Follow the established recovery procedure. Depending on the specimen and assay, this could involve additional clotting time followed by approved processing, or transfer and clarification of the serum using a validated method. Repeatedly spinning the original tube without assessing the cause is unreliable. Avoid manually fishing out fibrin or forcing serum through an unapproved filter; such handling can introduce contamination, remove material unpredictably, or leave smaller strands behind.
Document repeated fibrin problems alongside tube type, collection time, holding conditions, and collection source. A pattern limited to specimens spun early suggests a timing issue. Problems concentrated in one collection pathway suggest a different investigation, such as line contamination or inconsistent tube handling. This distinction directs corrective action toward the actual source.
Keep specimen timing separate from equipment preparation
Reusable laboratory items that undergo steam sterilization belong to a separate preparation workflow. For example, Autoclave Indicator Tape labels labware and changes from yellow to black or dark brown after its specified steam exposure of 121 °C for 15 minutes. That change indicates exposure to the stated conditions; it does not by itself establish sterility or show that a blood specimen is ready for centrifugation.
Keep sterilization records and specimen collection records distinct. Do not autoclave a blood collection tube for reuse unless the device is explicitly designed for that process. Reprocessing can change tube properties, and a sterilization indicator cannot establish suitability for blood collection or analytical testing.
For an urgent request, shortening the clotting interval introduces avoidable uncertainty. An approved plasma specimen or a validated faster serum collection system is an option only when the requested assay accepts it. When the existing plain tube must be used, let its specified clotting requirements and the sample’s condition determine the earliest acceptable centrifugation time.
Related Posts
Online Message
PROFESSIONAL CONSULTATION
If you are interested in our products and want to know more details, please leave a message here, we will reply you as soon as we can.